Apr 28, 2011

Royal Wedding

Dear ya'll,
Tomorrow morning my crazy self and my crazy family plan on getting up at 3 a.m. and sitting in front of the tube whilst munching homemade scones and sipping English breakfast tea. How very British of us. :)
Why? Because it's the royal wedding of course! Prince William is marrying Catherine Middleton in London, and we are going to watch it live (!).

Who's with us?? Any other crazy people out there? Tell me I'm not alone.
(Ok, I know I'm not alone. Why? Cuz they are estimating ONE THIRD of the ENTIRE population of PLANET EARTH to be watching the wedding. Um, wow much?)

And one last thing. This is hilarious:

(via)

:)

I hope you all caught that, but just in case, Harry is Prince William's brother. :)

DIY screen printing tutorial!

Last week I took a plain messenger bag (that I sewed in sewing class :) and screen printed it!


Here's how:

Supplies
*Embroidery hoop
*Old nylons
*Mod Podge
*Screen Printing Ink (bought at craft stores)
*Stiff paint brush
*T-shirt, bag, sweatpants etc. to print

First make the screen. Take an old pair of nylons and cut off about twelve inches from one leg. Cut that piece down the side so it opens into a large piece of nylon. Stretch over embroidery hoop. You'll probably need to hold the nylon in place with bits of duct tape until you can screw the embroidery hoop in place. :)


Now print off or draw the design you want. It can be a picture, words ... pretty much anything. But it's best to keep it simple. Silhouettes, line drawings etc. work well.
Lay the screen down on top of the design and trace it onto the screen with a permanent pen.


Now comes the slightly confusing part. Take Mod Podge and paint it all around the design on your screen. DO NOT paint the part you want the ink to go through. Basically your making a fancy stencil. Use a tiny stiff brush and make sure you paint Mod Podge very carefully along the edges. Any bits you miss will show in the finished product. Don't feel like you have to fill up the whole screen with Mod Podge though, just make sure the design is surrounded by a good inch and you'll be safe.


Once you let it dry, the screen is ready! It's a great idea to do a practice print on a scrap of cloth to make sure it works before printing your actual project. This is the paint I used:

Now lay your screen on whatever you're going to print. (Quick note: make sure you lay a piece of cardboard under the cloth. The paint sometimes leaks through. If you're doing a shirt, be sure to put the cardboard inside the shirt.)

Now drizzle some paint over your screen.


Use a stiff brush to work the paint into the screen. Don't miss a spot!

And now for the creeeeepy part. Lift up your screen and hope it worked! o_O


Now, if you missed a few tiny spots, don't panic. Just use a small brush to carefully touch it up.

Rinse your screen after every use, making sure to get rid of all the paint.  


Follow the directions on the paint bottle to set the ink, and wa-la!
:D

Let me know if you have any questions or if you decide to try this! It's super fun and addicting. :)

[Linking up here]

Apr 26, 2011

Beautiful randoms #1

Lately I've seen people posting favorite pictures from around the internet and leaving links to the sites where they found them. I always love looking at the amazing things people find, so I thought I'd do the same!

Some random things I love:
Rainbow Eucalyptus trees! I mean seriously, why has no one ever told me about these things before!? I feel so very deprived. ;)

Pieces of the outer bark are shed at different times, showing the bright-green inner bark. This darkens and matures to give blue, purple, orange and then maroon tones (!). Unbelievable.

(via)


Fennec foxes. Seriously. How. Adorable.

(via)


This print:

(via)


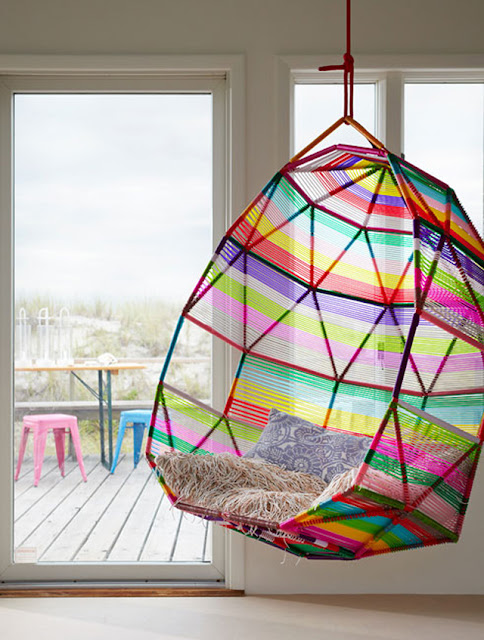
This chair hammock swing thingamajig!!

(via)


And this. Sounds like me. :)

(via)


So, what do you think? Should I do more posts like this?

Apr 23, 2011

Natural Dyed Easter Eggs

This year we tried something new, dying eggs with natural stuff!
We started out with tons of hard boiled eggs, brown and white ones.


Then we cut up purple cabbage and boiled it.


After straining the juice, and adding a fourth a cup of vinegar, we had one dye ready.

We did the same thing with beets.


We also made strong tea as a dye.


We put rubber bands around a few eggs to block the dye and create stripes.

 And then it was time to put them into the dye! Besides beets, purple cabbage and tea, we also put some powdered turmeric in water with vinegar for a yellow dye. And we made two dyes from boiling different kinds of onion skins, adding vinegar to each dye.
Below is yellow onion skin dye.


And the beet dye!


We figured out [the hard way] that you need to put the eggs in veeerrryy gently. Otherwise you get a big splat of juice on the floor. :)


The finished products! I love how the eggs from each dye came out different shades than each other. So cool.

Turmeric dye:

Red onion skin dye. They almost look wooden, don't they?

Purple cabbage dye:
(I LOVE the color of the one sitting on top, and
       the robins egg blue one in the bottom left corner. Also, check out the emu egg colored one on bottom!


Tea dye, kinda didn't work very well:

Yellow onion skin dye! Made a gorgeous orange.


Beet dye. Look at all the different shades of red, pink and purple!


All of them:


I love the blue and white one sitting on top to the left.


Doesn't this one look like lava?


                                                    Speckled.


I love how all the colors are so rich and earthy and natural. So much more beautiful to my eyes than fake color.
Do you have a favorite thing to do at Easter?

I felt I should end with something meaningful for this glorious holiday, but I don't really know what to say that hasn't been said before. I'm just so thankful for Christ and his life.
I love the words in this song. It's says so much so perfectly.

I hope you all have a beautiful Easter!

Apr 18, 2011

No boring plants allowed!

I recently got some new houseplants, so I thought I'd show you my plant collection!


Yes, that is a dinosaur planter! Pretty sweet, huh?
I may or may not have stolen copied the idea from this etsy shop. :)


I know you're all distracted by the dino, but don't ignore the beautiful rose! Or the plant in the dino! That plant is actually a coffee plant.
...
Yes, it is a real coffee plant. And no, it does not grow me coffee beans. It's not mature enough for that. And anyways coffee plants are tropical and don't zactly thrive where I live ... bleh.
But I still enjoy the fact that I own a coffee plant, even if it doesn't give me rich fragrant goodness in the mornings. :)


There's nothing really special about this next plant ... I just like it. :)


The next plant is a String of Pearls plant! I just got some cuttings of it, and they weren't very healthy when I got them. So the leaves are a little pointy. But I'm hoping that after I take care of it for a while it will grow healthy. A healthy string of pearls plant has completely round leaves that look like green pearls! Google it for images. Seriously. They're pretty sweet. Can't wait till mine looks like that! 


My bamboo plant. It lives in water. No dirt required. :)


Sensitive plant!
I had this plant before, but it died during the winter so I'm growing it from seed again. It's still really little, but I thought I'd share anyways, cuz it's amazing.
When you touch the leaves, they close up. Right before your eyes, and within a matter of two seconds or so (!).

Before touching, notice how the leaves are all open wide.


Poking in action!


And wa-la! The leaves are all closed and drooping. I know, wow right? :)
And after about five minutes the leaves will have slowly opened again!


And lastly, my new air plant display! For those of you who don't know, air plants do not live in dirt. They get all their water and nutrients right out of the air!
So basically it's just the plant part, there's no roots. And no pot or dirt is needed. You can stick 'em pretty much anywhere! So I attached them to a string for a living art piece. :)

If you want to see close-up pics of each one you can look at one of my old posts here.


I so love plants. :)
And there's a ton of super cool plants out there! For example, a plant that looks like a stone? Yeah. Oh, and how 'bout a plant that has flowers shaped like goldfish?
Not even joking.
I hope to get some more amazing plants this summer. If I do, I'll try to share pics with you!
Do you have a favorite plant?